On our previous post “Do you know how to design for digital“, several comments were made about matching spot colors. Over the next month, we will have a series of posts going up on the following topics related to Spot Color and Substitute Color Processing on Fiery Controllers:
- – Factors that influence spot color accuracy
- – Using Fiery Spot-On to manage and fine tune spot colors
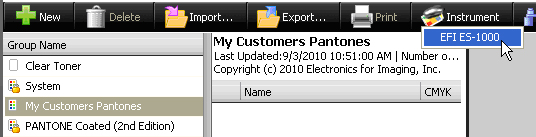
- – Creating and using a new Spot Color group, and capturing spot colors with an ES-1000 spectrophotometer
- – Creating and using substitute colors with Spot-On
Written by Malcolm Crawford, Senior Worldwide Technical Marketing Manager at EFI
But first, what are Spot Colors?
A spot color is a single ink (or colorant) that is traditionally used in offset printing. It is normally comprised of various pigments that when mixed, create a single color that can be used on an offset press. Xerox digital printers use cyan, magenta, yellow, and black (CMYK) inks to reproduce all colors, including spot colors. CMYK printers have a defined gamut (range of printable colors) that when combined with special processing and a profiled and calibrated Fiery controller, can simulate spot colors to the best capabilities of the printer.
Commercial Color Matching Systems, such as those provided by PANTONE®, include spot color palettes in their products that can be used by designers to create color schemes for projects. These palettes include both spot color names and alternate color values that will be used if the printer does not support the specific spot color ink requested. These alternate values are traditionally declared as CMYK that has been tuned to simulating the spot color using an offset press standard on coated papers however, some applications now use red, green blue (RGB) which is tuned to an average viewing monitor. Since Xerox digital presses use only CMYK inks these alternate values would normally be used. This would not be optimal since a digital CMYK press, which uses dry inks and digitally optimized papers, is not the same as an offset press and offset coated stock. This would result in spot colors that are not optimized for the digital press.
In order to ensure the Xerox digital press produces spot colors that are optimal for the printer, the Fiery controller provides look up tables (LUT’s) of most major commercial color matching systems, such as PANTONE. These LUT’s contain the spot color name as a key, and associated true color value (L*a*b*) as intended by the color matching system. L*a*b* color is a way of defining any color visible to the human eye without any limiting factors such as inks, paper and light. When the Fiery controller receives a spot color reference it searches these LUT’s for a corresponding match. If no match is found it will use the alternate CMYK or RGB values that were provided by the application. Alternate CMYK will go through the CMYK path and RGB will go through the RGB path. If a match is found the Fiery generates optimal CMYK values for the Xerox press by rendering the true (L*a*b*) color with the active output profile. The output profile is specific to the actual printing conditions. This method ensures that the true color is rendered with the actual printing conditions of the press delivering the most accurate and optimal color possible.
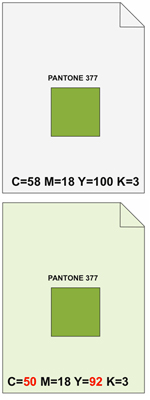 To illustrate the importance of the output profile consider the example shown to the left. You have two papers from different sources. One paper is a subdued white, slightly cool. The other paper has a faint green cast. Both papers have been profiled on your printer so each profile knows exactly what “paper white” is for each paper and exactly how the dry ink responds in your printing environment. Now we want to print PANTONE 377, which is a green. If I was to print this color using the same output profile on each paper, the greenish paper would be showing more green (dry inks are translucent therefore the paper white is added to the color). This means that we would not see the same green for PANTONE 377 on each different paper. If we used the correct profiles for each paper, as described above, the profile for the greenish paper would determine that less C and Y is required to achieve the correct color. This example has been exaggerated to demonstrate the importance of profiles, however even the slightest differences in paper white, texture, humidity and coating can cause significant shifts in spot colors, as well as other colors and objects. Profiling each paper will improve your overall color accuracy (Fiery Color Profiler Suite is recommended for best results).
Factors that influence spot color accuracy:
By default the Fiery is set to process spot colors using its extensive set of color matching system tables. The user does not need to set anything special, simply print the job. This allows for minimal intervention with an excellent interpretation and rendering of spot colors.
Here is a multi-level approach to improving spot color matching on the Fiery. Each level will cumulatively help improve the accuracy of spot color processing.
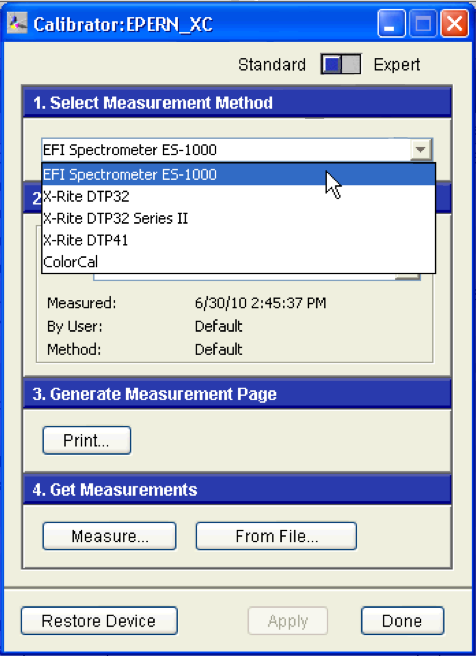
Level 1: Calibrate your Fiery regularly. Every Fiery includes one or more calibration methods, which should be used to ensure that the Fiery is in line with the engine. Methods that use an instrument, such as the ES-1000, will provide a more precise calibration. This may not apply to Fiery for iGen3/4, and calibration procedures may differ for engines equipped with an In-line Spectrophotometer (ILS)
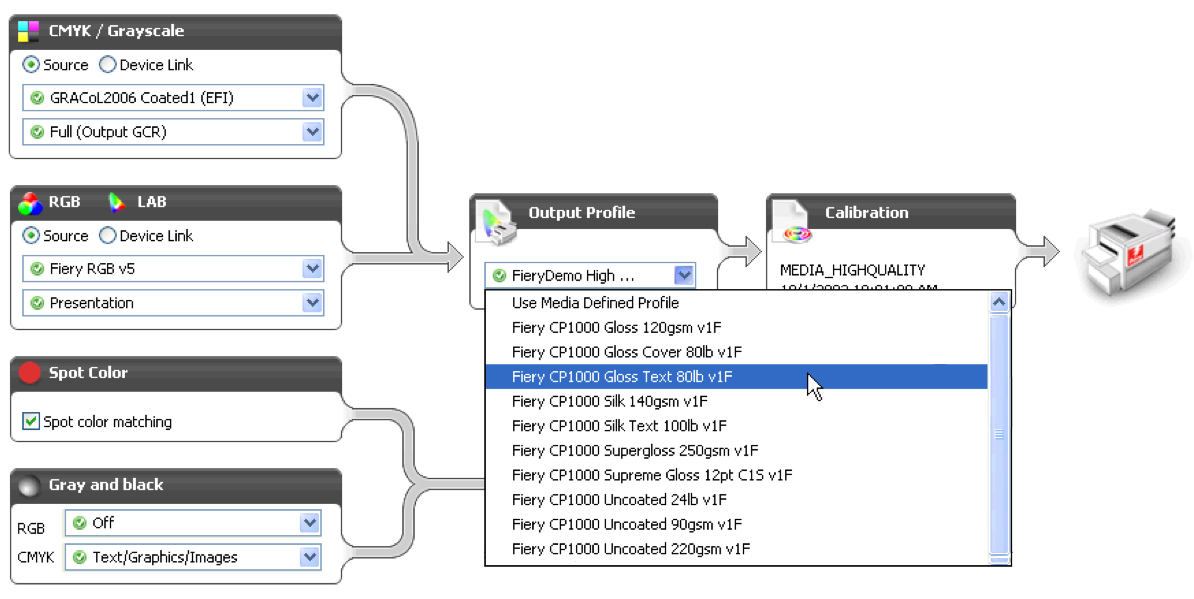
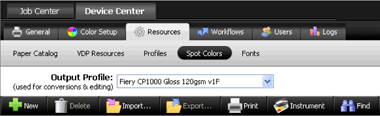
Level 2: Ensure that the most appropriate output profile is selected when printing a job. The output profile directly influences the specific Xerox press CMYK values generated by the spot color tables (LUT’s). All Fiery’s include factory standard output profiles for a variety of Xerox papers, weights and coatings. Select the profile that best matches your paper.
From the print driver properties or job properties in Command WorkStation5 select [Color > Basic Settings…]. Select the most appropriate output profile from the drop down menu.
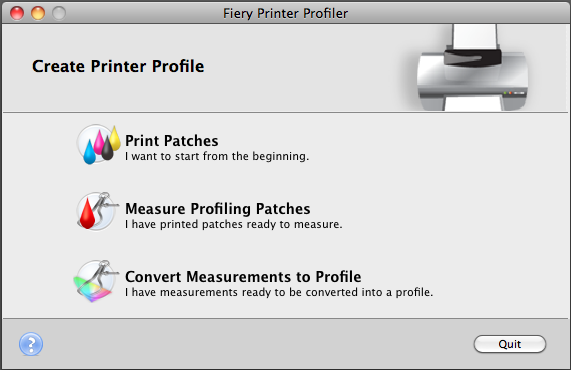
Level 3: Build and use your own output profiles. This allows you to characterize your exact printing conditions with your specific paper. Build profiles for each paper you use. You will need profiling software that includes an instrument in order to build output profiles. All Xerox production Fiery’s come standard with Fiery Color Profiler Suite, which includes an ES-1000 spectrophotometer. Fiery Color Profiler Suite can also be purchased as an option from your Xerox reseller.
Level 4: Manually tweak the spot color using Spot-On. Details are in my next post entitled Using Fiery Spot-On to manage and fine tune spot colors (Part 2)

This is very useful info to help me convey to my customers, please keep it up.
Can you speak to the use of Spot Colors in gradients? I have seen mixed results when a Spot Color is used in a design with tints and gradients. How to does the Fiery handle the conversion of a Spot Color when used this way?
When you are using tints and/or gradients, for an example lets say an 80% tint, then Spot-On will calculate the 80% L*a*b* value from the L*a*b* of the solid spot color. This goes for all tint values, they are calculated on the fly based on the L*a*b* value of the solid spot color. All these tints, in L*a*b* space, are then uniquely mapped to the given output profile.
If you use Spot-On to edit the solid color, then the tints will also be adjusted accordingly. That is when you edit the solid color, the tints are based on the percentages of the new L*a*b* of the solid color.
I had difficulty viewing the above image
“Command WorkStation5 select [Color > Basic Settings…]. Select the most appropriate output profile from the drop down menu.”
You mention Xerox paper profiles are included with the printers but I don’t think for instance Xerox Supreme Gloss 10 and 12 point is with either.
If one creates their own Spectro calibration it seems as though the custom settings for a Doc 240 are all for papers not for heavier weights.
Also how does one get the Xerox technician to set the copier so a Fiery has a good calibration vs target – we’ve had difficulties where one of the colors is pretty far from the desired calibration ending at 100% – the response is I set the copier to my calibration sheet. Seems wrong to be calibrating with a Spectro when the technician is only using a greyscale.
I’ve been wondering if one can utilize the calibration bars that can be turned on, to ideally indicate how far off the calibration is even after calibration and can they be used to pull the calibration in closer on successive prints?
Ken
Ahead of Level 1 – calibrate your monitor?
An advantage of the spectro – with profiler software it can do a color calibration of the monitor – One item I’ve noted is compared to Gracol profile the monitor profile is larger but seems to not cover the darker areas of the Gracol profile I’m planning to compare a few monitors to see what appears to be the broadest spectrum monitor.
Hello Ken,
Thanks for your comments, my responses below:
I had difficulty viewing the above image
“Command WorkStation5 select [Color > Basic Settings…]. Select the most appropriate output profile from the drop down menu.”
[MC] I believe Bill sent you a quick email with the image attached. I’m not quite sure why it isn’t displaying properly when clicking on the thumbnail, but I apologize for the inconvenience.
You mention Xerox paper profiles are included with the printers but I don’t think for instance Xerox Supreme Gloss 10 and 12 point is with either.
[MC] Xerox and EFI provide a variety of paper profiles, but not all with every engine. The Supreme Gloss stocks are not available with every model as the selection is based on “most commonly used” stocks with the engine. Xerox and EFI offer an optional product called Fiery Color Profiler Suite which has the ability to profile any specialty stocks and has modules to profile monitors and other key tools to creating a fully color managed workflow. Please check with your Xerox reseller for details.
If one creates their own Spectro calibration it seems as though the custom settings for a Doc 240 are all for papers not for heavier weights.
[MC] The DC240 provides basic calibration sets that cover the engine settings. One of these being “Heavyweight”. Using CommandWorkstation 5 (free at http://efi.com/cws5) you can associate any output profile to any calibration set and create a calibration that is tuned to your specific stock profile. Go to Device Center>Resources>Profiles>Output profiles. Select your output profile, then select Settings to assign or re-assign the calibration set to the desired profile. Please note that calibration does not use or store spectral data (as you mention here). Calibration simply measures the reflective density of linear C,M,Y and K patches, and applies correction to the expected response. Calibration is a regular process to ensure that daily (or periodic) fluctuations in ink density are kept in line. Profiles, on the other hand, do use spectral data to characterize the printing conditions of a specific paper on a specific engine.
Also how does one get the Xerox technician to set the copier so a Fiery has a good calibration vs target – we’ve had difficulties where one of the colors is pretty far from the desired calibration ending at 100% – the response is I set the copier to my calibration sheet. Seems wrong to be calibrating with a Spectro when the technician is only using a greyscale.
[MC] The Measurements v.s. Target screen is a guide to show the desired density ramp v.s. What was measured. On occasion the measured density will show slightly below the target density (not % but reflective density readings) inside the input 90-100% area. To ensure that you are getting the best density out of the engine please verify this target when using a standard Xerox 90gsm uncoated paper rated for Color, such as Color Xpressions. If the maximum density drops off before the 90% input mark you may need adjustment. Drop off past the 90% mark should not make a noticeable difference in color calibration, especially in the yellow. The Xerox technician can advise further.
I’ve been wondering if one can utilize the calibration bars that can be turned on, to ideally indicate how far off the calibration is even after calibration and can they be used to pull the calibration in closer on successive prints?
[MC] The Fiery for the DC240 does not offer tools to verify calibration other than the measurements v.s. Target. This tool does not show a corrected measurement, just the raw data. Also, iterative calibration is not offered. If you would like advanced tools to validate and monitor color the Fiery Color Profiler Suite has a module that provides a sophisticated measurement and monitoring system that provides precise Delta E readings and allows you to set acceptable tolerances.
Also, you offer very good advice in your previous comment when you say to calibrate your monitor ahead of Level 1 – thank you for the feedback!
Thanks for the post. I have found this very useful.
Thanks for the post. Very helpful!
command workstation
Device center
Resources
Spot color
Pantone + Solid coated
has a warning sign…for example pantone yellow 012 C
Lab
Original
warning sign at the bottom
Lab
Original/Converted
the numbers do not match…
can you answer, why?
Hello Annette,
Thank you for your question.
You actually have 2 questions:
First the warning sign. This sign appears when the conversion of the Pantone color from L*a*b* to the device specific CMYK of your selected profile results in one of the C, or M, or Y, or K channels being “0”. This means that there is no more room in that specific channel to adjust the color in an attempt to match the original L*a*b* color. It is commonly thought that the warning means that the conversion resulted in a color that is deemed out-of-gamut, however, that is not the case. It only means that no further reduction of that “0” value color is possible. For example, if the C channel was 0 it means that we cannot take C away any further.
The 2nd part of your question that the original and converted numbers do not match. This is normal for most colors in the Pantone table and does not mean that the resulting color is not an acceptable match. The original L*a*b* values are from the Pantone look-up table and represent the actual Pantone color in a non-device specific color space, also known as device-independent color. So, for example, these values define an absolute color regardless where it will be printed or viewed. Your printer is using CMYK inks so it needs to know the closest CMYK values that will match this absolute color. Once these CMYK values have been chosen it converts the CMYK back to L*a*b* to show you the difference between the absolute color and the color that your printer can produce using the specific profile selected within spot-on. This difference is measured colorimetrically using dE76 (DeltaE) which is the actual distance from the absolute color to the converted color. Lower values mean a closer match and higher values mean less of a match.
Best regards,
Malcolm Crawford
Senior Partner Alliance Technical Manager
EFI